Python Magic: Streamlining Your Desktop with a Cleanup Script👌
Photo by Hitesh Choudhary on Unsplash
Table of Content
Introduction
Setting Up Your Python Environment
Python Libraries for Desktop Cleaning
Creating Your Desktop Cleaning Script
Customizing Cleaning Rules
Automating Cleaning Tasks
INTRODUCTION
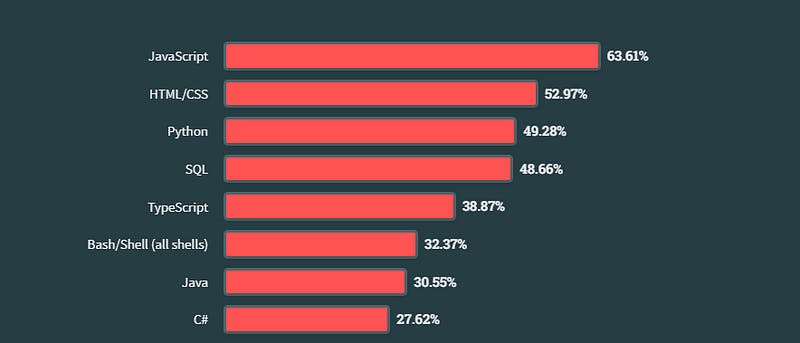
Stackoverflow 2023 programming language survey
Hey everyone, I want to share a cool project I created. Ever wished your desktop could clean itself up automatically? 🤔I used Python’s file management features to build a basic desktop cleaner. With a simple click, it scans specified paths for files and folders, organizing your desktop seamlessly✨. In this article, I’ll break down the key parts of the code, showing how easy it is to build handy tools like this with Python. Per the StackOverflow survey, Python's popularity makes it an excellent choice for such projects, offering ample resources and support. If you’re looking to tidy up your workspace, Python is a smart and accessible solution👌
Setting Up Your Python Environment
First, ensure you have Python on your computer if you don't click this link to download and install the latest version of Python.
In your terminal first install virtualenv. It is a tool to set up your Python environments. Since Python 3.3, a subset has been integrated into the standard library under the venv module. You can install venv to your host Python by running this command in your terminal:
pip install virtualenv
To use venv in our project, in your terminal, create a new project folder called desktop_cleaner, cd to the project folder in your terminal, and run the following command:
python -m venv venv
When you check your project folder, you will notice that a new folder called venv has been created. venv is the name of our virtual environment, but it can be named anything you want. To activate your virtual environment for your projects run the command below
venv\Scripts\activate

Once you see the highlighted text it indicates your virtual environment is active.
Python Libraries for Desktop Cleaning
Watchdog: Python API library and shell utilities to monitor file system events.
Shutil: module offers some high-level operations on files and collections of files. In particular, functions are provided that support file copying and removal. For operations on individual files
Pathlib: This module offers classes representing filesystem paths with semantics appropriate for different operating systems.
Datetime: The
[datetime](https://docs.python.org/3/library/datetime.html#module-datetime "datetime: Basic date and time types.")module supplies classes for manipulating dates and times.
Creating Your Desktop Cleaning Script
For this tutorial, I’ll be using the Pycharm IDE but you can use any IDE or text editor of your choice that works well with Python😊.
Below is the project file structure.
desktop_cleaner/
__init__.py
cleanedesk.py
EventHandler.py
extensions.py
...
Now, open the created folder in your selected IDE.
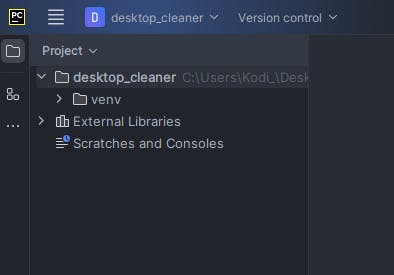
Next, create an __init__.py in the desktop_cleaner folder.
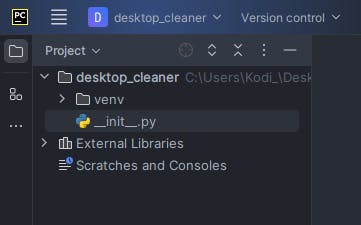
In Python, the __init__.py file is used to mark a directory as a Python package. It is used to initialize the package when it is imported.
Still, within the desktop_cleaner directory, create a Python file named extension.py. This Python file will contain all the extensions for the files to be read by our code.
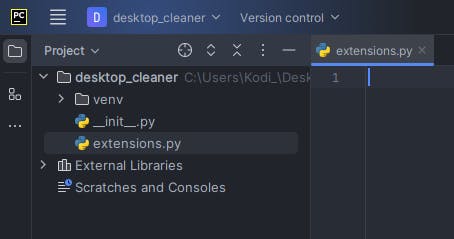
Within the extensions.py file, paste the code below into the file
extension_paths = { # No name 'noname': 'other/uncategorized', # audio '.aif': 'media/audio', '.cda': 'media/audio', '.mid': 'media/audio', '.midi': 'media/audio', '.mp3': 'media/audio', '.mpa': 'media/audio', '.ogg': 'media/audio', '.wav': 'media/audio', '.wma': 'media/audio', '.wpl': 'media/audio', '.m3u': 'media/audio', # text '.txt': 'text/text_files', '.doc': 'text/microsoft/word', '.docx': 'text/microsoft/word', '.odt ': 'text/text_files', '.pdf': 'text/pdf', '.rtf': 'text/text_files', '.tex': 'text/text_files', '.wks ': 'text/text_files', '.wps': 'text/text_files', '.wpd': 'text/text_files', # video '.3g2': 'media/video', '.3gp': 'media/video', '.avi': 'media/video', '.flv': 'media/video', '.h264': 'media/video', '.m4v': 'media/video', '.mkv': 'media/video', '.mov': 'media/video', '.mp4': 'media/video', '.mpg': 'media/video', '.mpeg': 'media/video', '.rm': 'media/video', '.swf': 'media/video', '.vob': 'media/video', '.wmv': 'media/video', # images '.ai': 'media/images', '.bmp': 'media/images', '.gif': 'media/images', '.jpg': 'media/images', '.jpeg': 'media/images', '.png': 'media/images', '.ps': 'media/images', '.psd': 'media/images', '.svg': 'media/images', '.tif': 'media/images', '.tiff': 'media/images', '.cr2': 'media/images', # internet '.asp': 'other/internet', '.aspx': 'other/internet', '.cer': 'other/internet', '.cfm': 'other/internet', '.cgi': 'other/internet', '.pl': 'other/internet', '.css': 'other/internet', '.htm': 'other/internet', '.js': 'other/internet', '.jsp': 'other/internet', '.part': 'other/internet', '.php': 'other/internet', '.rss': 'other/internet', '.xhtml': 'other/internet', '.html': 'other/internet', # compressed '.7z': 'other/compressed', '.arj': 'other/compressed', '.deb': 'other/compressed', '.pkg': 'other/compressed', '.rar': 'other/compressed', '.rpm': 'other/compressed', '.tar.gz': 'other/compressed', '.z': 'other/compressed', '.zip': 'other/compressed', # disc '.bin': 'other/disc', '.dmg': 'other/disc', '.iso': 'other/disc', '.toast': 'other/disc', '.vcd': 'other/disc', # data '.csv': 'programming/database', '.dat': 'programming/database', '.db': 'programming/database', '.dbf': 'programming/database', '.log': 'programming/database', '.mdb': 'programming/database', '.sav': 'programming/database', '.sql': 'programming/database', '.tar': 'programming/database', '.xml': 'programming/database', '.json': 'programming/database', # executables '.apk': 'other/executables', '.bat': 'other/executables', '.com': 'other/executables', '.exe': 'other/executables', '.gadget': 'other/executables', '.jar': 'other/executables', '.wsf': 'other/executables', # fonts '.fnt': 'other/fonts', '.fon': 'other/fonts', '.otf': 'other/fonts', '.ttf': 'other/fonts', # presentations '.key': 'text/presentations', '.odp': 'text/presentations', '.pps': 'text/presentations', '.ppt': 'text/presentations', '.pptx': 'text/presentations', # programming '.c': 'programming/c&c++', '.class': 'programming/java', '.java': 'programming/java', '.py': 'programming/python', '.sh': 'programming/shell', '.h': 'programming/c&c++', # spreadsheets '.ods': 'text/microsoft/excel', '.xlr': 'text/microsoft/excel', '.xls': 'text/microsoft/excel', '.xlsx': 'text/microsoft/excel', # system '.bak': 'text/other/system', '.cab': 'text/other/system', '.cfg': 'text/other/system', '.cpl': 'text/other/system', '.cur': 'text/other/system', '.dll': 'text/other/system', '.dmp': 'text/other/system', '.drv': 'text/other/system', '.icns': 'text/other/system', '.ico': 'text/other/system', '.ini': 'text/other/system', '.lnk': 'text/other/system', '.msi': 'text/other/system', '.sys': 'text/other/system', '.tmp': 'text/other/system' }
The code above categorizes all the widely used file extensions on a PC. I couldn't cover all of them😅.
Create another Python file called Evenhandler.py in the desktop_cleaner directory.
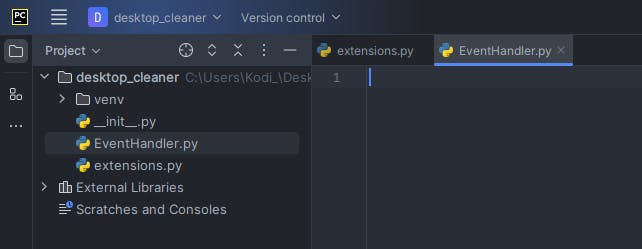
The primary purpose of this file is to determine how the directory subfolders will be stored based on their various file extensions.
Now copy the code below into the file
import shutil from datetime import date from pathlib import Path
from watchdog.events import FileSystemEventHandler
from extensions import extension_paths
def add_date_to_path(path: Path):
""" Helper function that adds current year/month to destination path. If the path doesn't already exist, it is created.
:param Path path: destination root to append subdirectories based on date """ dated_path = path / f'{date.today().year}' / f'{date.today().strftime("%b").upper()}' dated_path.mkdir(parents=True, exist_ok=True) return dated_path
def rename_file(source: Path, destination_path: Path):
""" Helper function that renames file to reflect new path. If a file of the same name already exists in the destination folder, the file name is numbered and incremented until the filename is unique (prevents overwriting files).
:param Path source: source of file to be moved :param Path destination_path: path to destination directory """ if Path(destination_path / source.name).exists(): increment = 0
while True: increment += 1 new_name = destination_path / f'{source.stem}_{increment}{source.suffix}'
if not new_name.exists(): return new_name else: return destination_path / source.name
class EventHandler(FileSystemEventHandler): def __init__(self, watch_path: Path, destination_root: Path): self.watch_path = watch_path.resolve() self.destination_root = destination_root.resolve()
def on_modified(self, event):
for child in self.watch_path.iterdir(): # skips directories and non-specified extensions if child.is_file() and child.suffix.lower() in extension_paths: destination_path = self.destination_root / extension_paths[child.suffix.lower()] destination_path = add_date_to_path(path=destination_path) destination_path = rename_file(source=child, destination_path=destination_path) shutil.move(src=child, dst=destination_path)
Explaining the above code blocks
from pathlib import Path from datetime import date
The function is named
add_date_to_path.It takes one parameter,
pathwhich is expected to be an instance of thePathclass.
current_year = date.today().year current_month = date.today().strftime("%b").upper()
date.today().yeargets the current year.date.today().strftime("%b").upper()gets the current month in abbreviated format (e.g., "Jan") and converts it to uppercase.
dated_path = path / f'{current_year}' / f'{current_month}'
path / f'{current_year}' / f'{current_month}' creates a new Path object by appending the current year and month as subdirectories to the original path.
dated_path.mkdir(parents=True, exist_ok=True)
mkdircreates the directories specified in the path.parents=Trueensures that parent directories are also created if they don't exist.exist_ok=Trueprevents an error if the directories already exist.
return dated_path
The function returns the final Path object representing the destination path with the current year and month.
Overall, this function is a utility that helps organize destination paths based on the current year and month, creating the necessary directories if they don’t already exist.
def rename_file(source: Path, destination_path: Path):
""" Helper function that renames a file to reflect a new path. If a file with the same name already exists in the destination folder, the file name is numbered and incremented until the filename is unique (prevents overwriting files).
:param Path source: source of the file to be moved :param Path destination_path: path to the destination directory """
The function is named
rename_file.It takes two parameters:
source(the source path of the file to be moved) anddestination_path(the path to the destination directory).The docstring provides information about what the function does and how to use it.
if Path(destination_path / source.name).exists():
Check if a file with the same name already exists in the destination folder.
increment = 0
while True: increment += 1 new_name = destination_path / f'{source.stem}_{increment}{source.suffix}'
if not new_name.exists(): return new_name
If a file with the same name exists, it starts incrementing a counter (increment) and constructs a new filename until a unique filename is found
return new_name
The function returns the new Path object representing the unique filename.
else: return destination_path / source.name
- If no file with the same name exists in the destination folder, it returns the original filename.
This function helps ensure that files are moved to a destination directory with a unique name to prevent overwriting existing files. The filename is modified by appending an incrementing number to it if necessary.
Class Definition:
class EventHandler(FileSystemEventHandler):
- Defines a class named
EventHandlerthat inherits fromFileSystemEventHandler.
Constructor (__init__ method):
def __init__(self, watch_path: Path, destination_root: Path): self.watch_path = watch_path.resolve() self.destination_root = destination_root.resolve()
- The constructor initializes the
watch_pathanddestination_rootattributes by resolving the provided paths.
on_modified Method:
def on_modified(self, event): for child in self.watch_path.iterdir(): # skips directories and non-specified extensions if child.is_file() and child.suffix.lower() in extension_paths: destination_path = self.destination_root / extension_paths[child.suffix.lower()] destination_path = add_date_to_path(path=destination_path) destination_path = rename_file(source=child, destination_path=destination_path) shutil.move(src=child, dst=destination_path)
This method is called when a file is modified in the watched directory.
It iterates over files in the
watch_path.It checks if the file is a regular file and has an extension specified in
extension_paths.It constructs the destination path based on the extension, adds the current date to the path, and renames the file if needed.
Finally, it moves the file to the calculated destination path using
shutil.move.
This class seems to be part of a file-watching system where files are moved based on their extension and modified events. The add_date_to_path and rename_file functions are used for organizing and renaming files. Note that extension_paths should be defined somewhere in your code, as it's referenced in the if condition.
Now let’s create a new Python file named cleandesk.py to put all the functionality together😁
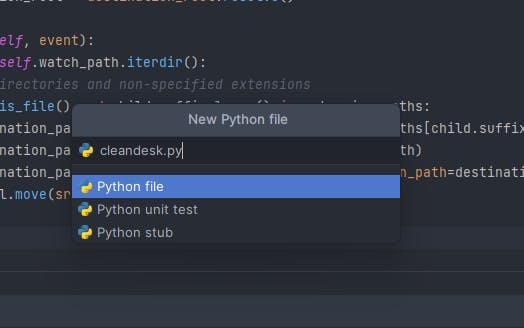
Copy the code below into your newly created Python file
from pathlib import Path from time import sleep
from watchdog.observers import Observer
from EventHandler import EventHandler
if __name__ == '__main__': watch_path_1 = Path.home() / 'Downloads' watch_path_2 = Path.home() / 'Pictures' watch_path_3 = Path.home() / 'Desktop' destination_root_1 = Path.home() / 'Downloads/holder of things' destination_root_2 = Path.home() / 'Pictures/holder of things' destination_root_3 = Path.home() / 'Desktop/holder of things'
event_handler_1 = EventHandler(watch_path=watch_path_1, destination_root=destination_root_1) event_handler_2 = EventHandler(watch_path=watch_path_2, destination_root=destination_root_2) event_handler_3 = EventHandler(watch_path=watch_path_3, destination_root=destination_root_3)
observer_1 = Observer() observer_1.schedule(event_handler_1, f'{watch_path_1}', recursive=True) observer_1.start()
observer_2 = Observer() observer_2.schedule(event_handler_2, f'{watch_path_2}', recursive=True) observer_2.start()
observer_3 = Observer() observer_3.schedule(event_handler_3, f'{watch_path_3}', recursive=True) observer_3.start()
try: while True: sleep(60) except KeyboardInterrupt: observer_1.stop() observer_2.stop() observer_3.stop() observer_1.join() observer_2.join() observer_3.join()
This script is a Python program that uses the watchdog library to monitor three different directories (Downloads, Pictures, and Desktop) for file system events (such as file modifications) and automatically organizes files in those directories into a corresponding "holder of things" subdirectory.
Let’s break down the script in detail:
Import Statements:
from pathlib import Path from time import sleep from watchdog.observers import Observer from EventHandler import EventHandler
Pathis a class from thepathlibmodule that represents file system paths.sleepis a function from thetimemodule that pauses the execution of the script for a specified number of seconds.Observeris a class from thewatchdog.observersmodule that observes file system events.EventHandleris a custom class defined in a separateEventHandler.pyfile, handling file system events.
Main Execution Block:
if __name__ == '__main__':
- This common Python idiom checks whether the script is being run as the main program.
Directory Paths:
watch_path_1 = Path.home() / 'Downloads' watch_path_2 = Path.home() / 'Pictures' watch_path_3 = Path.home() / 'Desktop' destination_root_1 = Path.home() / 'Downloads/holder of things' destination_root_2 = Path.home() / 'Pictures/holder of things' destination_root_3 = Path.home() / 'Desktop/holder of things'
Path.home()returns the home directory of the current user.Three
watch_pathvariables are defined for the directories to be watched (Downloads,Pictures, andDesktop).Three
destination_rootvariables are defined for the corresponding "holder of things" subdirectories.
Event Handlers and Observers:
event_handler_1 = EventHandler(watch_path=watch_path_1, destination_root=destination_root_1) event_handler_2 = EventHandler(watch_path=watch_path_2, destination_root=destination_root_2) event_handler_3 = EventHandler(watch_path=watch_path_3, destination_root=destination_root_3)
observer_1 = Observer() observer_1.schedule(event_handler_1, f'{watch_path_1}', recursive=True) observer_1.start()
observer_2 = Observer() observer_2.schedule(event_handler_2, f'{watch_path_2}', recursive=True) observer_2.start()
observer_3 = Observer() observer_3.schedule(event_handler_3, f'{watch_path_3}', recursive=True) observer_3.start()
Three instances of the
EventHandlerclass are created, each associated with a different pair ofwatch_pathanddestination_root.Three instances of the
Observerclass are created and configured to use the respective event handlers and directories.The observers start to monitor the specified directories.
Main Loop and Exception Handling:
try: while True: sleep(60) except KeyboardInterrupt: observer_1.stop() observer_2.stop() observer_3.stop() observer_1.join() observer_2.join() observer_3.join()
The script enters a main loop where it sleeps for 60 seconds (
sleep(60)) to keep the program running.It catches a
KeyboardInterruptexception (typically triggered by pressing Ctrl+C in the terminal) to gracefully stop the observers.observer.stop()is called for each observer to stop monitoring.observer.join()is called for each observer to wait for the observer's thread to finish.
This script is essentially a main Python file organizer that continuously watches three directories for modifications and organizes files into corresponding subdirectories. It uses the watchdog library for efficient file system event handling.
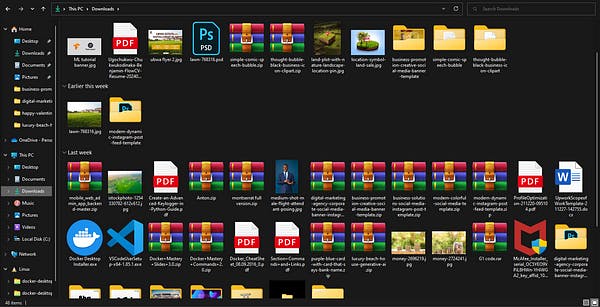
For testing purposes, you can run the cleandesk.py file to see the Python magic happen as the specified directories are cleaned up.
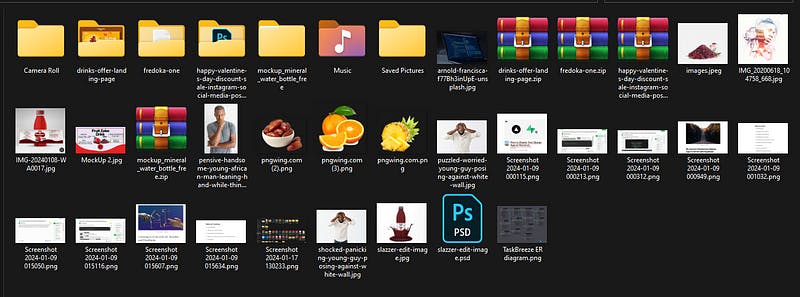
Before running the cleaning script
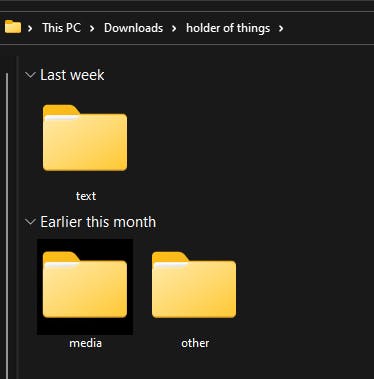

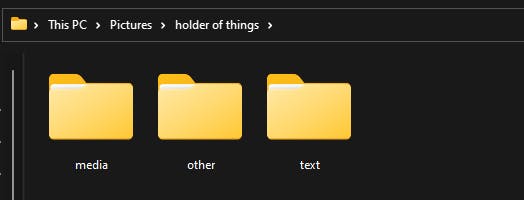
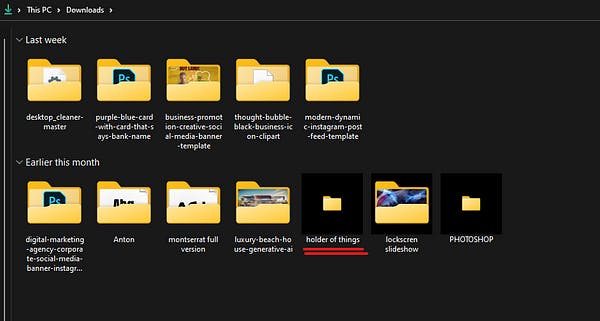
After running the cleaning script
Customizing Cleaning Rules
To customize the cleaning rules for your Python desktop cleaner, you can modify the extension_paths dictionary. Here are five ways you can customize the rules:
- Add New File Extensions:
- To include additional file types, simply add new key-value pairs to the
extension_pathsdictionary. For example:
'.new_ext': 'custom_folder/custom_subfolder'
2. Modify Existing Paths:
- Adjust the destination paths for existing file extensions to suit your organization's preferences. For instance:
'.txt': 'text/my_text_files'
3. Create New Categories:
- Introduce new categories by specifying unique folder structures for certain file types. For example:
'.xyz': 'custom_category/subfolder
4. Exclude Specific Extensions:
- If you want to exclude certain file types from being organized, you can remove them from the
extension_pathsdictionary. For instance:
del extension_paths['.unwanted_ext']
5. Change Root Destination Paths:
- Modify the root destination paths for different watch paths by adjusting the
destination_rootvariables in the main script. For example:
destination_root_1 = Path.home() / 'Downloads/new_destination'
Remember to consider the organizational structure that makes the most sense for your workflow and adjust the paths accordingly. After making changes, restart the script to apply the updated cleaning rules.👍
Automating the Cleaning Task
Now to automate the cleaning Python script on your computer we are gonna be using the Windows task scheduler to run the script at predefined intervals.
To run your Python scheduler you will need to create a task, create an action, add the path to your Python executable file and to your Python script, and add a trigger to schedule your script.
1. Create Your First Task
Search for “Task Scheduler”.
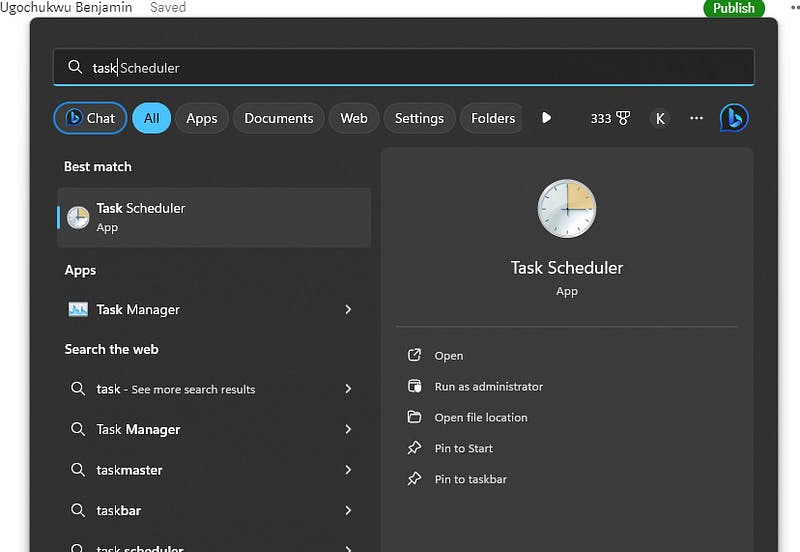
This will open the Windows Task Scheduler GUI.
Go to Actions > Create Task…

Give the task a name.
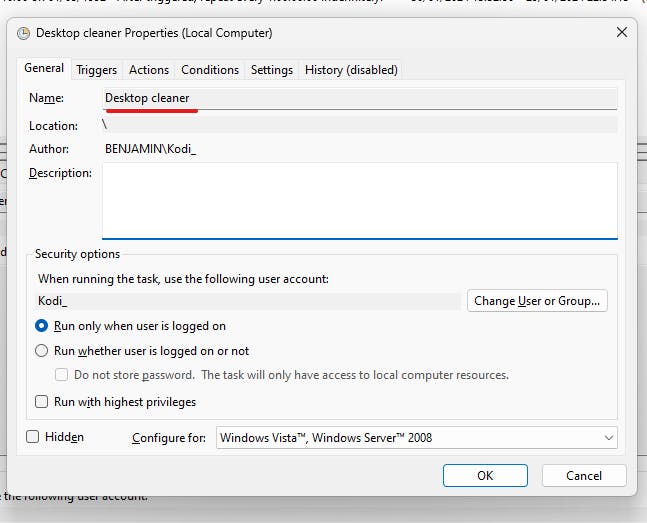
Click “OK”.
2. Create an Action
Go to Actions > New
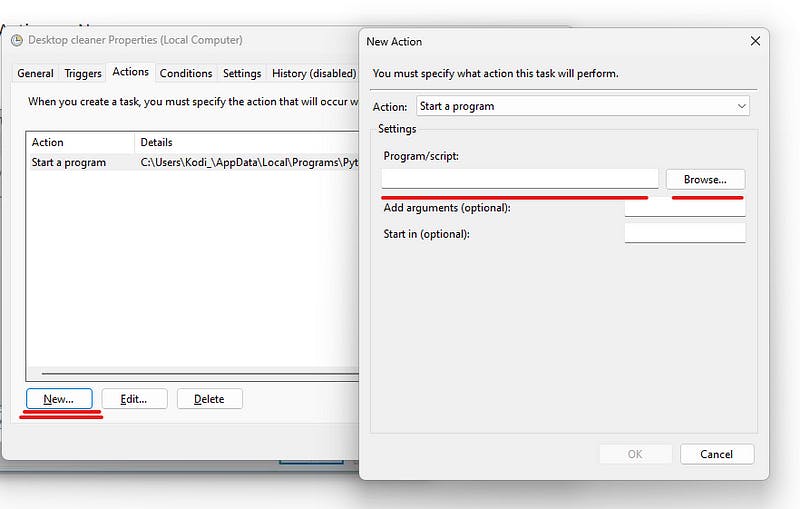
Click “OK”.
3. Add the Python Executable File to the Program Script
Find the Python Path using where python in the command line.

From the command prompt copy the script to use in the action.
*C:\yourpath\python.exe*or in my case
C:\Users\Kodi_\AppData\Local\Programs\Python\Python310\python.exe
In Program/Script, add the path you copied from the command line.
Click “OK”.
4. Add the Path to Your Python Script in the Arguments
Go to the folder where your Python script is located. Right-click on the file and select Copy as path.
If you have a file located at this location.
*C:\user\your_python_project_path\yourFile.py*
In the "Add arguments (optional)” box, you will add the name of your python file.
*cleandesk.py*
In the "Start in (optional)" box, you will add the location of your python file.
C:\Users\Kodi_\Downloads\desktop_cleaner-master\desktop_cleaner

Click “OK”.
5. Trigger Your Script Execution
Go to “Triggers” > New
Choose the repetition that you want. Here you can schedule Python scripts to run daily, weekly, monthly, or just one time.
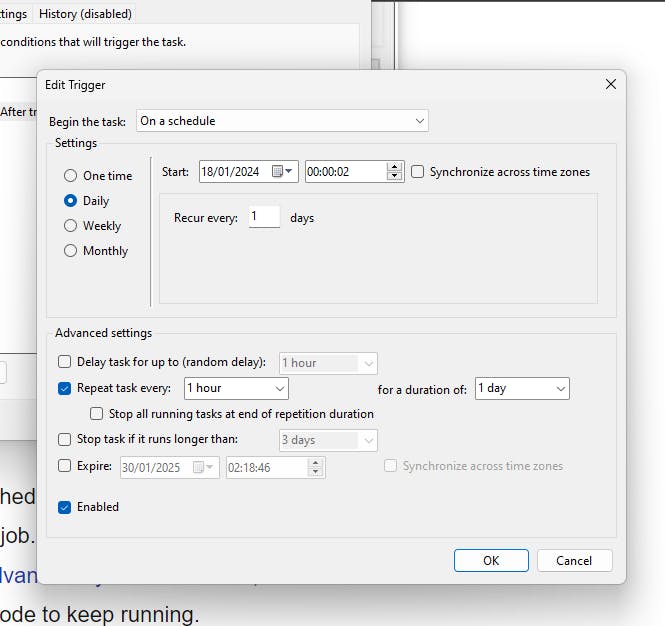
Once, you have set this up, your trigger is now active and your Python script will run automatically every day.
Now the Python cleaner will run every day at every hour. Pretty neat if you ask me😉.
In conclusion, if you want an easy way to keep your desktop from spiraling into chaos, look no further than a Python cleanup script. With a little coding knowledge, you can customize a solution that perfectly fits your workflow. Say goodbye to desktop clutter — with Python on your side, a tidy desktop is only a script away! 👉Soruce code👈

